Automating Social Media Reconnaissance
Posted on Mon 05 June 2017 in Python
Risk in the Age of Social Media
Consider this: maybe your LinkedIn profile is a little too detailed, and maybe you should stop attaching your location to your tweets, especially while at work.
Social media is a rich source of open source intellgience (OSINT), and measuring social media exposure is becoming increasingly common in penetration testing and operational security.
Because there are dozens of free collection tools that allow anyone to systematically harvest and analyze these public posts, the ubiquity of social media brings with it organizational risks that businesses are still learning how to mitigate.
Recon-ng, one of the more comprehensive tools, is a web reconnaissance framework that comes pre-installed with Kali Linux and can be used to automate the collection and visualization of social media posts that contain geographic metadata.
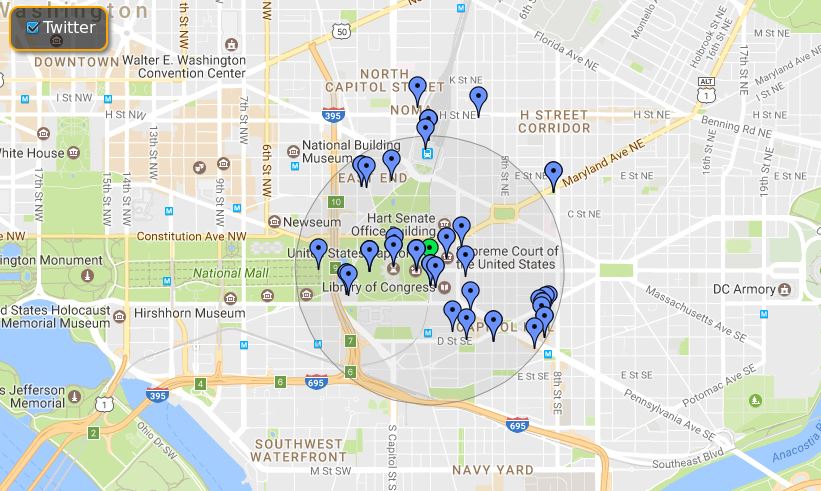
Visualizing collected posts for a specificed geographic location can lead to some great insights, which recon-ng provides via its pushpins feature by grabbing location metadata (latitude, longitude) from geo-tagged posts in a defined radius, and plotting them with Google Maps.
Tim Tomes, the author of recon-ng, has a great video (Recon-ng Pushpin Intro) which can quickly bring you up to speed on the feature before we make a small change to the source, and ultimately automate the framework's collection capabilities.
Recon-ng comes with modules for pulling posts from Flickr, Instagram, Picasa, Shodan, Twitter, and Youtube. For the sake of simplicity (not to mention, a single tweet has a lot of data), we'll just use Twitter.
Clone the Source
There's a small problem with recon-ng's default Twitter module. By default, every GET request to Twitter's Search API returns 15 tweets per page. But to get the most out of our collection, it's in our interest to raise the limit.
Open up a terminal in your Kali Linux VM and enter git clone https://bitbucket.org/LaNMaSteR53/recon-ng.git to clone the source onto your machine.
The file structure should (roughly) look like this:
-- recon-ng
| -- data/
| -- modules/
| -- recon/
| -- recon-cli
| -- recon-ng
| -- recon-rpc
| -- recon-web
Modify the Twitter Module
To retrieve more than the default number of tweets per page (15), we need to add a count paramter to the GET request in twitter.py which can be found at recon-ng/modules/locations-pushpins/twitter.py.
The original code in the module_run function should look like:
def module_run(self, points):
    rad = self.options['radius']
    url = 'https://api.twitter.com/1.1/search/tweets.json'
    for point in points:
        self.heading(point, level=0)
        self.output('Collecting data for an unknown number of tweets...')
        results = self.search_twitter_api({'q':'', 'geocode': '%s,%fkm' % (point, rad)})
Add 'count':'100' after geocode so that the results variable looks like:
results = self.search_twitter_api({'q':'', 'geocode': '%s,%fkm' % (point, rad), 'count':'100'})
This added parameter will return the maxium number (100) of tweets per page in your call to Twitter's Search API.
Beginning Collection
Before we're ready to automate the collection process, there's some minimal setup involved.
Inside of the cloned recon-ng repositoy should be (another) recon-ng - but this is the executable included with the source.
Start the framework by entering ./recon-ng into your terminal.
API Keys
After acquiring Twitter API keys, store them in recon-ng's Keys table by entering your access and secret keys with the keys add twitter_api <YOUR_KEY> and keys add twitter_secret <YOUR_KEY> commands. (To view any API keys you have stored in recon-ng, enter keys list.)
Workspaces
In recon-ng, workspaces are containers that allow you to collect and store reconnaissance for specific projects/targets. Results from any modules you may run within this workspace will only be stored in the current workspace's tables.
For our purposes, we'll create a workspace called "twitter_recon" with the command workspaces add twitter_recon - yes, it's pretty intuitive.
workspaces select twitter_recon will place you into this workspace (and if you don't select one, you're placed in the default workspace).
Locations
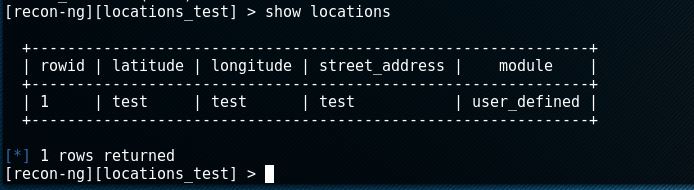
Remember, database interaction is the central mechanism in the recon-ng framework. Just like the Keys table for your API credentials, the Locations table allows users to store addresses and coordinates.
Enter add locations. Assuming that you don't know the latititude and longitude of your target locations, skip those options when prompted (press enter), but specify an address.
The geocode module will provide the exact latitude and longitude of the target address. Enter load recon/locations-locations/geocode and then run. The show locations command will print the Locations table, which should now have a completed row (latititude, longitude, address).
Twitter Search
The twitter.py module we modified will use Twitter's Search API to pull tweets that were created within close proximity to the target location. Load the module by entering load recon/locations-pushpins/twitter and then - you guessed it - run.
Results are stored as pushpins for the map that we're going to produce at the end.
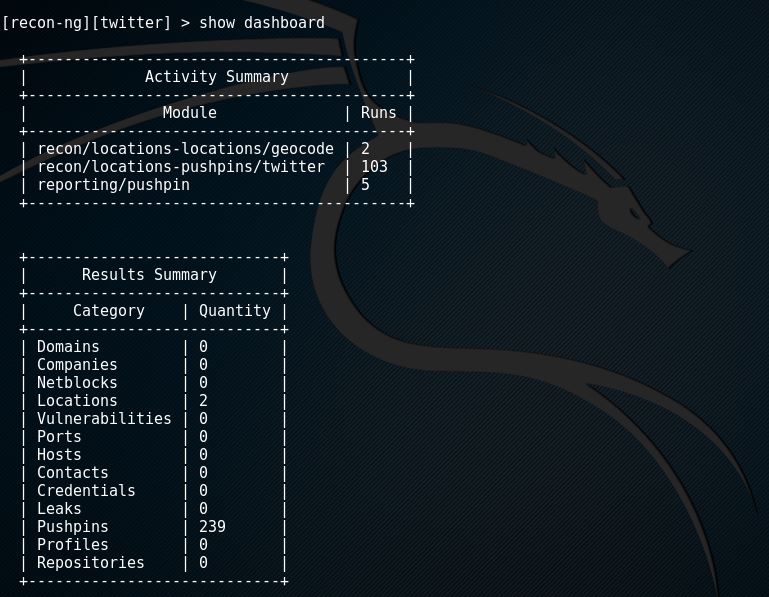
The show dashboard command will present a brief overview of your activity and results, including how many times you've run each module in the current workspace, and how many pushpins (tweets, in our case) you've harvested.
Reporting & Visualizing
Remember, the point of this exercise is to visualize the geotagged social media posts we've collected and plot them within a specified radius of our target locations.
Recon-ng's reporting module makes this effortless. Enter these commands:
load reporting/pushpinsshow locations(note: this just makes the next steps easier)set LATITUDE <target_latitiude_goes_here>set LONGITUDE <target_longitude_goes_here>set RADIUS 1(note: if the target is in an urban or heavily populated area, set the radius to 0.5)run
After following these steps, the reporting/pushpins module will generate two reports in your browser. The first will chronologically list all of your pushpins in a column (which we're not concerned with here), and the second will plot all of the geotagged posts as pushpins on a Google map.
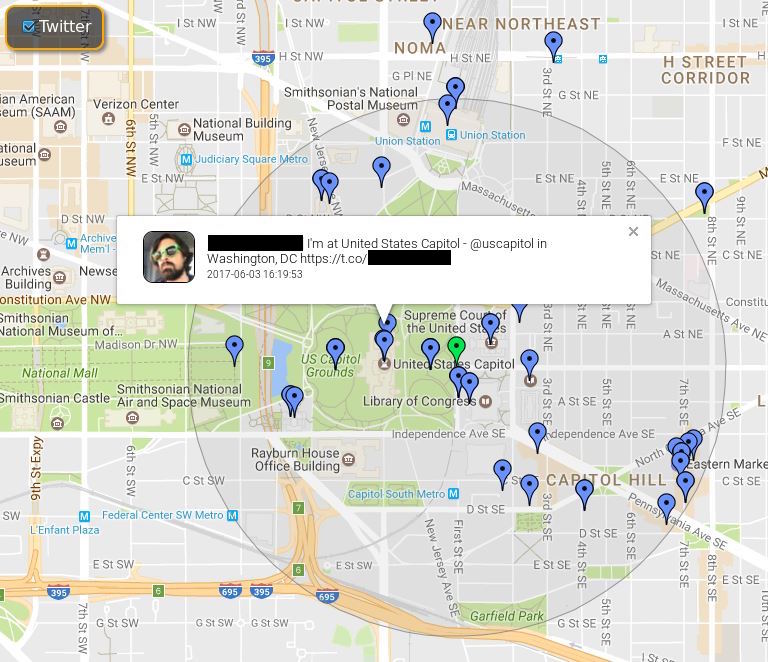
You can interact with any of these pushpins. Each pushpin has a link to the user's Twitter profile and a link to the specific tweet that you collected.
Automating the Process
With the help of a resource file and cron job, we won't have to repeat these steps every time we want to collect geotagged posts and store them in our workspace.
- Resource file: a text file with the commands you want the recon-ng framework to run automatically.
- Cron job: a program that allows Unix users to automatically execute commands and/or scripts at a specified point in time.
Creating a Resource File
For the sake of being explicit, create a new file called commands.txt in the same directory as your recon-ng executable and add the following lines to it:
workspaces select <your_workspace_name>load recon/locations-pushpins/twitterrunexit
Because there's only a need to automate collection, the commands to generate the reports will be ommitted from the resource file (you won't need to look at the map every minute of the day).
If you want to visualize how the resource file feeds your commands to recon-ng, enter the following command in your terminal: ./recon-ng -r commands.txt.
You should see the recon-ng framework start up and enter your specificed workspace, load and run the Twitter module, and exit.
Creating a Cron Job
Entering sudo contab -e in your terminal will allow you to create new cron jobs, as well as edit any existing cron jobs you may have1. All cron jobs are added as a single line to the bottom of the file.
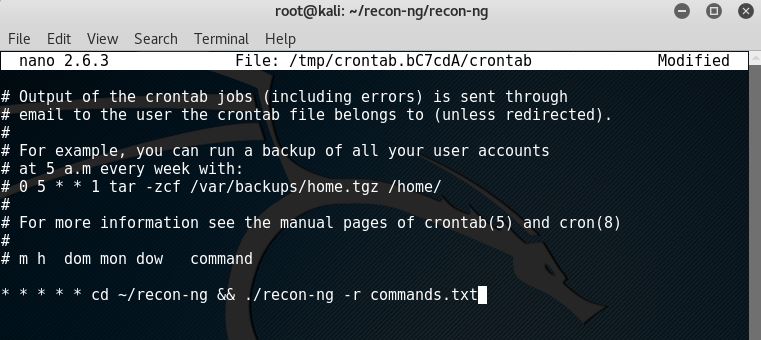
* * * * *: run every minute of every daycd ~/recon-ng: enter the recon-ng directory./recon-ng -r commands.txt: run the recon-ng executable with our resource fle
It's slightly overkill to pull from the Twitter API every minute of every day, but it doesn't really matter for our purposes - duplicate results aren't stored in your workspace's tables.
Whenever you want to check your results, fire up ./recon-ng in your terminal, load the reporting/pushpins module, and run it (you don't need to set the latitude, longitude, and radius again).
Troubleshooting Tip
Because the cronjob doesn't run the recon-ng in your terminal, you're not going to see it run at whatever interval you specified it to. A simple way to ensure that your cron job is working is to spin up recon-ng, enter your workspace, and run the show dashboard command again. If the Runs count for the recon/locations-pushpins/twitter is increasing, your cron job is working!